To do this activity...
You need to understand how a seismograph works. If you have not read through the main lesson ("Earthquake!"), go back and read about seismographs first. You will also need some materials and a place to build your seismograph.
a) Think of a creative but effective way to measure the seismic waves (shock waves) from an earthquake. Draw a clear diagram that shows and labels all parts. Then write a paragraph explaining how your design works. A good design would be...
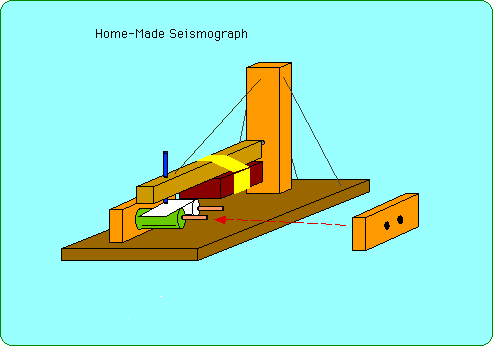
Here is a simple seismograph you can build:
This seismograph can be built will some simple materials. Dimensions are approximate -- you might be able to vary them or even modify the design.
a) If you have a drill, you can mount the two wood dowels in holes drilled through the two wood support blocks. If you do not have a drill, saw two slots into the upper edge of each wood support block and then drop the dowel into these slots.
b) The pen must write easily when pulled down onto the paper roll by the brick. Cap it when not in use. You may try substituting a soft lead pencil, a charcoal pencil, a crayon, etc.
c) Fasten the wood stand securely to the wood base by nailing upward from underneath the wood base. The wire (or cord) attached to the back and side of the wood stand will help to keep it stable.
d) Fasten the screw securely into one end of thewood beam . This screw will rest against the wood stand so that the wood beam hangs level over the base. To help the screw stay in place and not slip off of the wood stand , drill or carve out of the stand a small hole 1/4-inch deep and slightly larger in diameter than the screw head. The head of the screw can sit in this hole and press against the wood stand.
e) Both the adding machine paper roll and the smooth can should be able to rotate. The smooth can rotates when you crank the nail at one end of its wood dowel; the paper roll can turn either with its wood dowel or separately from thedowel. Tape down the end of the paper roll onto the can so that when you crank the can, the paper should wind up around the can and cause the paper roll to rotate as it feeds paper to the can.
f) If you want to be creative, see if you can devise a way to make the paper roll feed onto the smooth can automatically so that you do not have to crank the can by hand. You might try buying a miniature battery-operated motor that can turn the wood dowel of the can.