|
Session 3: The Interplanetary Magnetic Field (IMF)
“I’ve never encountered a magnetic field I didn’t like.” – George Craig
Session Summary
In light of their discoveries of electromagnetism from the Exploring Magnetism Guide, students will be charged with the task of designing an experiment for NASA’s STEREO/IMPACT mission to measure the interplanetary magnetic field. The three main goals of this lesson are for students to:
- know what the Interplanetary Magnetic Field (IMF) and Earth’s magnetosphere are;
- know about spacecraft, booms, and magnetometers; and
- understand why a magnetometer boom is needed on a spacecraft that is sent to space to measure the interplanetary magnetic field, i.e. that the currents associated with the spacecraft’s electronics will cause local magnetic fields that are larger than the interplanetary magnetic field.
This lesson can also be used to assess a student’s understanding of electromagnetism.
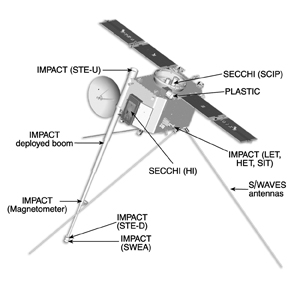
Figure 3.1 A diagram of one of the STEREO satellites is shown. Groups of scientific instruments are located on the side of the satellite body. The body of the satellite is called the satellite bus. The IMPACT boom is labeled and shown as it will look once it is in space and has been extended, i.e. deployed. Wait until the end of the lesson to show students this picture so that they can develop their own boom designs first. Drawing courtesy of NASA.
Student Objectives
- Students will know the concept of the Interplanetary Magnetic Field (IMF).
- Students will know why a magnetometer boom is needed on a spacecraft studying the IMF.
- Students will be able to use their knowledge of magnets, magnetic fields, and electromagnetism to create a model of a real-world instrument used to measure magnetic fields from a NASA satellite.
- Students will use real-world engineering techniques to create a practical and functioning NASA satellite that can study and accurately measure the IMF.
National Science Education Content Standards
- Unifying Concepts and Processes: Evidence, models, and explanation; Change, constancy, and measurement
- Science as Inquiry: Abilities necessary to do scientific inquiry; Understandings about scientific inquiry
- Earth and Space Science: Structure of the Earth System; Earth in the Solar System
- Science and Technology: Abilities of technological design
Previous Knowledge Required
It is important for this activity that students understand electromagnetism. Specifically, students should understand that:
- currents in electric circuits create magnetic fields,
- electric circuits (and thus magnetic fields) are found with anything that uses electricity to run,
- the strength of magnetic fields decrease rapidly the farther away you move from the source of the magnetic fields, and
- larger magnetic fields will dominate over smaller magnetic fields. This is because magnetic fields are vectors and thus add and subtract as vectors add and subtract. Introducing vector addition could be done prior to this lesson but is not at all necessary.
If your students do not know the properties of electromagnetism mentioned here, then it would be useful to have them go through at least Session 1: Activity 1, Session 2: Activity 1, and Session 2: Activity 3 of the Exploring Magnetism teacher’s guide.
Materials Needed (per group of students)
- 2 Alnico bar Magnets
- 4 small compasses
- 20 paper clips
- 1 small cardboard box (about 6x3x3” in size)
- Construction paper
- Aluminum foil
- Wax paper
- Newspaper
- Scotch tape
- Glue
- Scissors
- Per Student: 1 copy of NASA STEREO mission story found in the Background Material section
- Per class: Transparency copies of Figures 3.2, 3.3, 3.4, and 3.5
- back to top -
Activity 1: Learning About Space Weather
- back to top -
Now that your students know about electromagnetism, they will learn about the magnetic fields of the Sun and Earth. This activity is a question-answer activity where the students are using “minds-on” rather than “hand-on” inquiry.
Your students should have already learned about atoms, phase transitions, and some basic information about the Sun. In particular, for this activity it is best to ensure that the students know that:
- Atoms are made up of electrons, protons, and neutrons.
- Hydrogen is a common element in the universe and it is made up of one electron and one proton.
- In the right pressure environment, as a solid is heated it turns to liquid. As a liquid is heated it turns to a gas.
- The Sun is made up mostly of hydrogen.
- The Sun is hot because gravity acts to pull the mass together so much that near the core of the Sun atoms are pushed together and join together in fusion reactions. These fusion reactions mostly convert hydrogen into helium plus light energy (in the form of gamma-rays). This light energy interacts with matter and is transformed into heat.
- The Sun is so hot that the electrons cannot stay attached to the nucleus of the atom. This means the Sun is mostly a hot, electrically charged gas, which is known as “plasma.”
- The Sun has different layers and its outer layer is called the corona.
It is possible to include in the activity a lecture about these things but it is more meaningful if they have learned them in another context and you can remind them about those lessons in this activity.
Introducing the Interplanetary Magnetic Field (IMF) and Solar Wind
| 1. |
 |
First have the students answer the question: “What objects in space have magnetic fields?” [The Sun, Earth, the Moon, Mars, Jupiter, Saturn, Uranus, and Neptune all have magnetic fields. Other planets and objects, such as Venus, do not have magnetic fields because there is not a fluid or gas dynamo in their core; or because the crust of the planet or object does not contain magnetic material.]
|
|
| 2. |
|
Review with your students what they know about the Sun. [The Sun is a star. A Star is a big ball of dense gas made up mostly of hydrogen that generates its own energy through nuclear fusion.]
|
|
| 3. |
|
After some discussion, emphasize that Earth and the Sun have large-scale magnetic fields near their surfaces that are similar to the magnetic field of a bar magnet. Have the students look at their magnetic field maps from Session 1: Activity 1, and Session 2: Activity 3 of Exploring Magnetism. Then have them draw a circle around the region where the bar magnet was located, making the diameter of the circle the same as the length of the bar magnet.
|
|
| 4. |
|
Discuss that this circle and the surrounding magnetic field lines approximately represent the Sun and its large magnetic field lines.
|
|
| 5. |
|
Ask your students: “Where does the Sun’s magnetic field come from?” Remind your students about the activities with the electric circuits. [The Sun’s magnetic field comes from currents in and around the Sun that are caused by the moving plasma.]
|
|
| 6. |
|
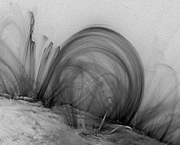
Explain to your students that close to the surface of the Sun, the magnetic fields can be complicated with many north and south poles close to one another. Show the image of such magnetic fields taken by an instrument viewing the Sun in ultraviolet light, located on the NASA TRACE satellite (Figure 3.2).
|
|
| 7. |
|
Far from the surface of the Sun, the magnetic fields are also different from the bar magnet. They look more like someone’s very long hair flowing out and away from the Sun with a very flat doughnut of current circling around the Sun. This magnetic field is called the “Interplanetary Magnetic Field.”
|
|
| 8. |
|
Give a short lecture (5-10 minutes) about the solar wind and explain that it is connected to the Sun’s magnetic field. [The corona is the outer-most layer of the Sun that is so hot that it streams out and away from the Sun’s gravitational pull, producing the solar wind. This wind is not a neutral wind and nothing like wind on Earth. It is an electric wind with a very low density. The solar wind is attached to the Sun’s magnetic fields and together they stream out into space, past all the planets.] See the background resources to learn more about the solar wind and to obtain movies of the corona and features flowing out into the solar wind.
|
Introducing the Magnetosphere
- back to top -
Activity 2: Measuring the IMF
- back to top -
In this activity, your students will discuss how they would measure the Interplanetary Magnetic Field (IMF). They will experiment with different ways of measuring Earth’s magnetic field direction using a compass that is in some way attached to a box with a strong magnet inside. Earth’s magnetic field represents the interplanetary magnetic field and the box with a magnet represents a spacecraft with currents inside. The currents inside the spacecraft create a magnetic field stronger than the magnetic field of the interplanetary magnetic field, just as the magnet inside the box has a stronger magnetic field than Earth’s magnetic field.
The day before this activity, you can have your students bring materials in from their home that they might want to use in their experiment, such as a cardboard box, cardboard, aluminum foil, or newspaper.
This is an inquiry activity, so you should not reveal to the students how scientists and engineers have solved the puzzle. Emphasize to the students that they are to experiment and come up with their own ideas. To learn more about how scientists and engineers design a spacecraft boom so that the spacecraft magnetic fields do not interfere with the experiment to measure the IMF, see the Background Material section. In addition to a boom, engineers sometimes also use “mu-materials” to shield magnetic fields from motors. These materials are not readily available for the classroom, however.
 |
|
Figure 3.2
An image of magnetic field lines near the surface of the Sun (the photosphere) is shown. This image was taken by collecting ultraviolet light in an imager on the NASA TRACE satellite. |
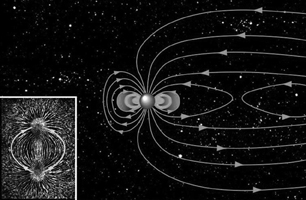
Figure 3.3
A depiction of the magnetic fields around Earth, known as the Magnetosphere, is shown as viewed from the ecliptic plane. The “North” pole is really a magnetic south pole which attracts the north poles of compasses. The solar wind modifies the dipole field lines far from Earth. Image courtesy of NASA. |
|
 |
 |
|
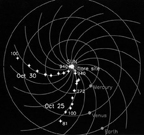
Figure 3.4
A model of the magnetic field (spiral lines) of the Sun (in the middle) is shown as one looks down on the Sun’s axis of rotation. This magnetic field is known as the Interplanetary Magnetic Field (IMF). The orbits of Mercury, Venus, and Earth are shown as circles. The spiral of the IMF shown here is due to the fact that the IMF is attached to the rotating Sun, but we draw it from a non-rotating perspective from above. Image courtesy of NASA. |
| 16. |
|
Tell the students to imagine that they are NASA scientists who want to better understand the Interplanetary Magnetic Field (IMF). They want to learn more about the magnetic fields that are ejected from the sun. Ask the students: “How would you measure the IMF?” Continue probing until someone suggests that they would put a satellite into space with some way to measure the magnetic field direction (such as using a compass). [If a student asks why we have to go to space to measure the IMF, explain that the IMF at Earth’s distance from the sun is 10,000 times less strong than Earth’s own magnetic field and there are continuous variations in Earth’s magnetic field that are much larger than the IMF strength.]
|
|
| 17.. |
|
Tell the students that an instrument to measure magnetic fields is called a magnetometer. This word can be broken down into its two basic parts: magnet and meter, meter meaning a device used to make measurements. A compass is a very simple magnetometer; it is also an incomplete magnetometer since it cannot measure the strength of the field.
|
Designing an experiment to measure the IMF
| 18. |
|
Tell your students that they will now design a simplified experiment to measure the IMF. Explain the puzzle that scientists and engineers have when they want to measure the interplanetary magnetic field (IMF): The electricity on the spacecraft that is needed to run the instruments creates a magnetic field (see Figure 3.5). This magnetic field is stronger than the interplanetary magnetic field. If they put their magnetometer on the spacecraft body, called a “spacecraft bus,” they will measure the magnetic field of the spacecraft and not of the IMF.
|
|
| 19. |
|
Tell the students that they will solve this puzzle by pretending a box with a magnet inside is the spacecraft and Earth’s magnetic field is the IMF. They will have available many materials to use for their designs, such as construction paper, aluminum foil, tape or glue, a compass, and any other materials they have brought from home.
|
|
| 20. |
|
Next, have your students get into groups. Each group should have a small box (on the order of a 6x3x3” box), a strong bar magnet, and several compasses. Have each group put the bar magnet inside the box and close the box.
|
|
| 21. |
|
Now tell the students that they have to solve the same puzzle that the scientists and engineers have to solve when they want to measure the IMF: they must somehow attach the compass or compasses to the box but they have to measure the direction of Earth’s magnetic field and not the magnetic field of the bar magnet inside the box. To solve this puzzle first they must answer the question: “How would you determine which magnetic field you are measuring (Earth’s or the bar magnet)?” Have a small discussion so that the students understand the question.
|
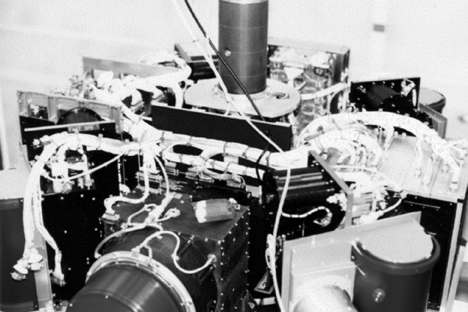
Figure 3.5 Shown above are the instruments and the wires that carry the electricity to run the instruments on the Fast Auroral SnapshoT (FAST) satellite. A magnetic field is associated with the current running through the wires and so the satellite has an overall magnetic field. Photograph courtesy of NASA.
- back to top -
Activity 3: Science and Engineering Conference
- back to top -
In this activity, your students will act as scientists and engineers at a conference to explain and share their designs and discoveries with other students (scientists and engineers).
- back to top -
Going Further: Writing a scientific report
- back to top -
| 29. |
|
As an assessment to this session, have the students write a technical report on their design. They should include in their report:
- An introduction section that says why they want to measure the interplanetary magnetic field and how their experiment is analogous to that of a spacecraft in the interplanetary magnetic field.
- A design section that explains what the design was and what materials they used, and why they chose this design.
- An experiment section that explains how they tested their design.
- A discussion section that says whether or not their design worked and what they would do differently the next time they did this design.
|
- back to top -
A NASA “Story” of STEREO/IMPACT: Introductory Material
- back to top -
There are many scientists who want to understand more about the Sun. They know that the Sun is a fiery ball of gas that gets so hot that gas flies out from the Sun at very high speeds. Many of the electrons in the Sun’s atoms have enough energy to leave the atoms. These new particles are called ions. These ions and electrons are flowing from the Sun and together they are known as the solar wind. The ions and electrons dance in the Sun’s magnetic field. Scientists discovered that the solar wind and its magnetic field flow together out past Mercury, past Earth, and continue out past Pluto. Because the magnetic field is threaded throughout the solar system, we call it the interplanetary magnetic field, that is the magnetic field found between (inter) the planets (planetary).
Scientists have also noticed that the Sun goes through different cycles, just like moody people who are calm and quiet some days but other days, they explode with anger. But of course the Sun doesn’t have emotions to drive its cycles! Physical principles, such as magnetic and electric forces, drive its cycles. During the Sun’s active cycle, parts of the Sun will explode, sending out even more solar wind and magnetic fields than it typically sends out.
What happens to the solar wind and magnetic fields that the explosions send flying out into space? Well, sometimes the explosive solar wind will flow by Earth, where we all live. Luckily Earth has a magnetic field and a thick layer of atmosphere, which protect all living creatures on Earth from the particles and radiation that can come from such solar explosions. But when astronauts are up in space, sometimes the magnetic field isn’t strong enough to protect them and they have to run, or rather float, back into their space vehicles, such as the space station. Scientists asked themselves: “What triggers these explosions?” How do these explosions flow out and away from the Sun? How do these explosions make ions and electrons go so fast?”
How are the scientists going to answer these questions? Well, they have studied the solar explosions while sitting (or standing) on Earth using telescopes. They named these explosions coronal mass ejections. Scientists like to give names to specific types of events so that everyone knows what they are talking about using only a couple of words. That is efficient. NASA scientists like to make it even easier by making an acronym out of the name. An acronym is made with the first letter of each word in the name. What acronym would you use for the term: interplanetary magnetic field? What does the acronym NASA stand for? NASA scientists make a Coronal Mass Ejection into an acronym too: a CME.
With just one satellite, scientists can only measure magnetic fields at one point in space, and that’s just what they have done. And with one satellite at a time, they have discovered many things about the Sun. But really, scientists need to measure the interplanetary magnetic field and the solar wind at more than just one point. Two instruments studying the Sun from two different places will help them understand better how the explosions move outward.
So, several scientists proposed to put up two satellites at the same time. These two satellites would be able to take photographs of the Sun from two perspectives, and instruments on the satellites would measure the Interplanetary Magnetic Field in two locations. If we converted the data into sound and listened through headphones, the data could come out in stereo! And so, this mission was named STEREO, which is short for Solar Terrestrial Realations Observatory. As they say, “Two ears are better than one!” The reviewers at NASA, who are other space scientists, said: “Yes! These are good science questions and a feasible mission. Let’s do it!” And the U.S. Congress agreed to pay for it. And so instruments and a satellite are being built for the NASA STEREO mission in order to study the Sun’s explosions. And now you too can be a part of this mission.
We never really answered the question: “How are the scientists going to measure the interplanetary magnetic field?” This is what you are going to answer in the next activities centered on electromagnetism. First, you have to remember what you know about magnetic fields and how to measure them. Then you have to design a model experiment that could work on a spacecraft to measure the interplanetary magnetic field. And then you have to create your design, test it, and share your design and model with your fellow scientists and engineers, that is — your fellow students. This is exactly what scientists and engineers working on the STEREO/IMPACT NASA mission have had to do.
- back to top -
Worksheets and Rubrics
- back to top -
The Session 1 Worksheets and Rubrics can be downloaded here:
- back to top - |
|
