|
Session 2: Electromagnetism
“We now realize that the phenomena of chemical interactions and, ultimately life itself are to be understood in terms of electromagnetism.” - Richard Feynman
Session Summary
Students will learn about the generation of magnetic fields from currents in wires and they will learn how to measure the magnetic field directions. By the end of this session, the students should know specifically that currents in wires create magnetic fields. Students will use magnetic compasses to explore magnetic fields in their environment where they will discover that electronic equipment also produces magnetic fields. Students will also learn that moving magnetic fields can create currents and thus that the magnetic and electric forces are interrelated.
Student Objectives
-
Students will know that the Earth has a magnetic field and it acts almost like a bar magnet.
-
Students will know that electricity flowing in wires creates an invisible magnetic field.
-
Students will be able to use magnetic compasses to explore the magnetic fields in their world.
-
Students will understand the relationship between magnetic and electrical fields known as electromagnetism.
National Science Education Content Standards
-
Unifying Concepts and Processes: Evidence, models, and explanation; Change, constancy, and measurement
-
Science as Inquiry: Abilities necessary to do scientific inquiry; Understandings about scientific inquiry
-
Physical Science: Properties and changes of properties in matter; Motions and Forces
Previous Knowledge Required
For this session, students should already understand electricity, circuits, and the concepts of electrical charge and force . Students should also understand that:
-
Electricity is moving charges that create a current,
-
Metals more readily conduct electricity,
-
In electrical circuits charges will flow through conducting material when an electrical force is applied across it
-
When a battery is connected to a circuit it provides such a force and that negative charges will flow away from the negative terminal toward the positive terminal.
-
How to set up a simple electrical circuit with batteries in series, a switch, and a coil.
The teacher should provide a lesson or review of these topics prior to teaching about electromagnetism. See the “Resources” section for good electricity and circuit lessons.
Materials Needed (per group of students)
-
1 magnetic compass per student
-
1 “boombox” stereo with audio speakers (optional)
-
Several pieces of blank Paper
-
1 pair of wire cutters (in most cases scissors will do the trick)
-
A spool of copper wire (covered with an insulating enamel)
-
Small patch of sand paper for removing wire enamel at connection points
-
3 insulated wires with alligator clips
-
3 Batteries (D-cells, 9-volt, etc.) with optional battery holders.
-
1 AC to DC adapter with variable voltage
-
1 knife switch
-
1 Ammeter or Galvanometer
-
1 bar magnet and/or cow magnet
-
1 or 2 paper clips
-
Scotch tape
-
Pencils and paper
Hints
-
Recommendation: Checking that current is flowing in a circuit
You can check to see if current is flowing in a circuit by attaching an ammeter or galvanometer in series. These should read off the amount of current flowing. Another way is to add a small light bulb in series to the circuit. However, a light bulb will add resistance to the circuit which will decrease the current. This weakens the magnetic field significantly. It is not recommended that you leave the light bulb in the circuit while doing the activities.
-
Caution: Using alligator clips
The alligators clips used in these experiments are often made of metals that are magnetic. The copper wire leads to and from the coils used in the experiment should be long enough that the alligator clips are kept a reasonable distance away from the coils. Otherwise, the alligator clips will magnetically interact with the magnets, compasses, and electrified coils.
- back to top -
Activity 1: Exploring Magnetic Fields in Your Environment
- back to top -
| 1. |
 |
If possible, take the class outside, far away from buildings, power lines, or anything electrical or metal. Have them bring a compass and a lab notebook. Have students spread out and walk around a bit. Ask them to point in the direction their compass is pointing when the face of the compass is horizontal. Make sure that they move slowly and allow the compass needle to stop its oscillations (caused by moving it around) before they point. They should all be pointing in the same direction toward North. [Note: they will be pointing toward the magnetic pole which is offset from the geographic pole.]
|
 |
| 2. |
 |
Discuss with students that Earth has a magnetic field and it acts almost like a bar magnet.
|
 |
| 3. |
 |
Hand out Worksheet 2.1 to your students. Have students draw what they think Earth’s magnetic field looks like.
|
 |
| 4. |
 |
Next, have students use the compasses to probe whether there are any sources of magnetic fields (large and small) around the school and in their classroom. They should be sure to take careful notes on the kinds of objects and places they explore and what kinds of magnetic fields they encounter. They can fill out Worksheet 2.1 to guide their note-taking. Near the end of their explorations about the school, the teacher should bring out a boombox stereo and have them explore the magnetic field around it while it is operating, paying special attention to the speakers (which work using a modulating magnetic field) and the CD player which uses an electromagnetic motor to spin the disc.
|
 |
| 5. |
 |
Have a discussion about the students’ observations by asking questions such as:
- Where did they detect magnetic fields?
- Were they complex, as with several magnets, or simple, like one magnet?
- Were they constant in time?
In general, they should find magnetic fields around operating electronic equipment, and possibly metals.
|
- back to top -
Activity 2: Compass Needles Around a Simple Circuit
- back to top -
!! WARNING !! AC currents and voltages from household electrical outlets are potentially lethal and students should be instructed explicitly not to experiment with them. However, the batteries and circuits that students will investigate in this lesson are not dangerous. The voltage provided by even many batteries in series can produce enough current to make the wires very hot, but there is no danger of life-threatening shocks.
During this activity, groups of students will set up simple electrical circuits (See Figure 2.1) to demonstrate that electric currents can be the cause of the magnetic fields seen around electronic devices (some are caused by magnets in the electronics themselves, like the boombox stereo speakers).
| 6. |
 |
To set up the simplest electric circuit connect the positive and negative terminals of a battery using the insulated alligator clip wires to a switch (pictures in Figure 2.1). Have students set up the apparatus and make sure they understand that electricity will be flowing through the wire when the switch is closed (turned on). Allow students to explore the wire with a magnetic compass before closing the switch. Then have students close the switch and explore the wire again with the compass. Suggest that the students pick up the wire and measure the magnetic field direction all around the wire. Have them record all observations. They should observe that when current is flowing in the wires there is a magnetic field present around the wire. Be sure that they observe the direction of the magnetic field with the compass. Students may be surprised that the magnetic field does not point along the wire but rather perpendicular to it. Discuss with the students what they observed.
|
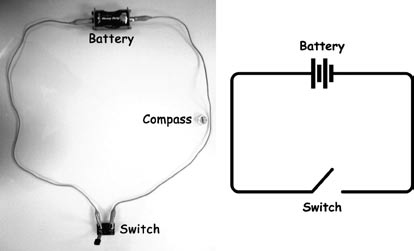
Figure 2.1 A simple electrical circuit
| 7. |
 |
Emphasize that currents generate magnetic fields. Electronic equipment operates by using electric circuits. Therefore electronic equipment generates magnetic fields. Depending on the level of the students, explain (or not) that current is a moving charge—as a charge moves, it creates a changing electric field of force around it. This changing electric field manifests itself as a magnetic field that is found to wrap around the wire. It is important to emphasize this point
|
 |
| 8. |
 |
Next, from a spool of copper wire have students measure out and cut off two lengths of wire, approximately 6-feet and 24-feet long. Have the students wrap the wires into coils. The diameter of the coils should be large enough that the magnets will fit inside length-wise (about an inch or so). They can use scotch tape to hold the coil together. Example coils are pictured in Figure 2.2.
|
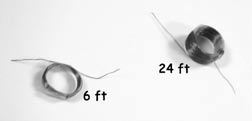
Figure 2.2 Coils of wire, taped together. On the left is a 6-foot length of wire, on the right is a 24-foot length of wire.
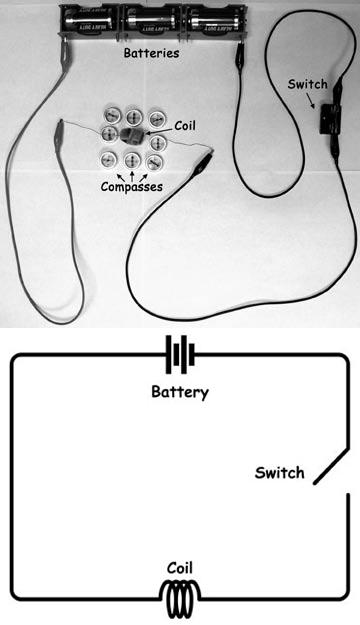
Figure 2.3 An electrical circuit with a coil of wire included. Compasses placed around the coil will detect any magnetic fields produced by the electrical current.
- back to top -
Activity 3: Mapping Magnetic Field Lines
- back to top -
!! WARNING !! AC currents and voltages from household electrical outlets are potentially lethal, and students should be instructed explicitly not to experiment with them. However, the batteries and circuits that students will investigate in this lesson are not dangerous. The voltage provided by even many batteries in series can produce enough current to make the wires very hot, but there is no danger of life-threatening shocks.
In this activity, students will use compasses to trace out the magnetic field surrounding a coil, just as they did with a bar magnet in Session 1. To get a large enough magnetic field that can be easily traced, you will need to have a very large coil of wire with a moderate-to-large voltage. If you have enough spools of wire, each group should use an entire spool as their coil (See Figure 2.5). Also, you may need a more steady voltage source than chemical batteries can provide. Over the time that it will takes students to do the tracings the batteries’ voltages will fluctuate, which could make doing the tracing very difficult as the shape of the magnetic field will also fluctuate. One possibility is for you to connect the electrical circuit to an AC to DC adaptor which will then be plugged into an AC electrical outlet in your classroom. Voltages produced by such adapters typically range from around 3 volts to 12 volts. See Figure 2.4 on how to configure the circuit with an AC to DC adapter as the power source.

Figure 2.4 Configurations for using an AC to DC adapter as a power source in the electrical circuit. Configurations will vary depending on the type of adapter plug. For the adapter shown, positive and negative terminals are on the outside of the plug separated by a plastic insulator.
If you are concerned about using the electrical outlets in your room for this experiment then use at least 3 D-Cell batteries connected in series for the voltage source. Chemical batteries may not put out a consistent voltage for long periods of time, but if the students conduct the field tracing quickly they may not experience too much of a problem.
Also, note that the higher the voltage used, the quicker the coil of wire will become hot to the touch. If you are using a full spool for each group, instruct the students to avoid touching the spool. After about 10 minutes instruct the students to open the switch and let the coil cool. If the students need more time for tracing they should take care not to move the coil or any of the set-up until they close the switch again and continue with the tracing.
For the tracing it is useful to get the connection wires away from the table surface. Pictured in Figure 2.5 is one possible way to accomplish this (using plastic cups and rulers). The coil should also be taped down to the paper on the table. Taping the paper together and then down to the table is also suggested.
[Hint: If you are short on supplies or unable to have each group of students have access to an electrical outlet, this activity and the next two in the session could be done as stations. Students can then rotate from one station to the next.]
| 15. |
 |
Have students use a ruler, books, tape, a coil of wire, and alligator clipped wire, and paper to construct the mapping area, as shown in Figure 2.5.
|
 |
| 16. |
 |
Have the students map the magnetic field as was done in Session 1. See in particular action 7 to review how to do the tracings.
|
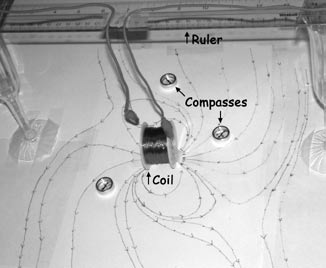
Figure 2.5 Here the entire spool of wire is used as a coil in an electrical circuit. The glasses and ruler are used to hold the wires off the table so that a tracing of the magnetic field around the coil can be drawn on the paper beneath it.
| 17. |
 |
Discuss the mappings with the students. How do they compare with the bar magnet mappings in Session 1? [Students may find that not all the loops they started end up closing back on the coil. Some lines may just go off in one direction parallel to one another. This is Earth’s magnetic field. The magnetic field of Earth and the field of the coil add together and subtract from each other depending on the directions of the fields. Closer to the coil the dipole field of the coil dominates and farther from the coil Earth’s magnetic field dominates.]
|
- back to top -
Activity 4: Jumping Coils
- back to top -
!! WARNING !! AC currents and voltages from household electrical outlets are potentially lethal, and students should be instructed explicitly not to experiment with them. However, the batteries and circuits that students will investigate in this lesson are not dangerous. The voltage provided by even many batteries in series can produce enough current to make the wires very hot, but there is no danger of life-threatening shocks.
In this Activity students will investigate the strength of the magnetic field produced by coils of wire with current traveling through the wire.
| 18. |
 |
Have the students return to their coil circuit as discussed in Activity 2 of Session 2 and Figure 2.3. Students will use Worksheet 2.3 and the set-up of Activity 2. Students will set up 6 different configurations of their circuit and coils. For both the 6-foot coil and 24-ft coil the circuit will include either 1, 2, or 3 batteries in series. For each configuration, students will conduct two experiments:
(1) Have them line up three compasses spaced about half a centimeter apart along one side of the axis of the coil and also place a bar magnet perpendicular to the coil axis several inches away (see Figure 2.6). When the switch is closed they will qualitatively measure how much each compass needle deflected. (e.g.: not at all, slightly, moderately, a lot). The bar magnet is there to insure that the compass needles are not initially lined up with the coil axis, but be sure it is not too close, otherwise it will dominate over the magnetic field of the coil.
(2) Have them hold a cow or bar magnet horizontally and hang the coils on the very edge of one end of the magnet. When the switch is closed, they will measure how far the coil was thrown (see Figure 2.7). They can do this by marking the starting and ending position on a piece of paper placed on the table-top. Make sure there is enough wire connected between the coil and the switch and batteries so that it will not interfere with the jumping distance.
[Hint: For this step a cow magnet works great and is recommended. However, a regular bar magnet will work too.]
In the end, they should conclude from their data that a coil with more loops of wire produces a stronger magnetic field, and that a larger voltage from more batteries in series (and hence a larger current) also produces a stronger magnetic field. They should also note that the strength of the field gets weaker with distance, as is true of all magnets.
|
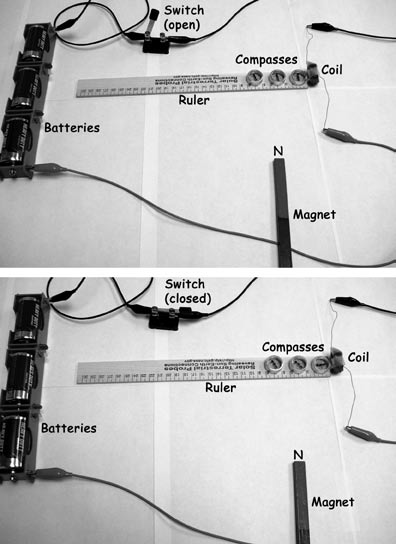
Figure 2.6 Set-up for the experiment with compasses aligned along the axis of a coil of wire.
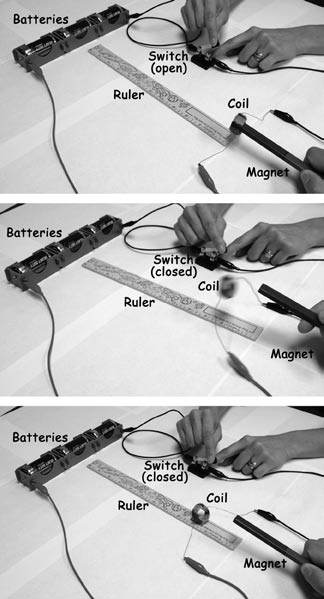
Figure 2.7 Set-up for the Jumping Coils Experiment
- back to top -
Activity 5: Electric Current Generated with a Moving Magnet
- back to top -
[This last Activity of Session 2 is an appropriate continuation of the lesson for high school students. The aim of these steps is to allow students to discover what the source of magnetism is. National Science Education Standards suggest that using the particulate nature of matter to explain electrical and magnetic phenomena is inappropriate for younger middle school students, as they may not be developmentally ready for that concept.]
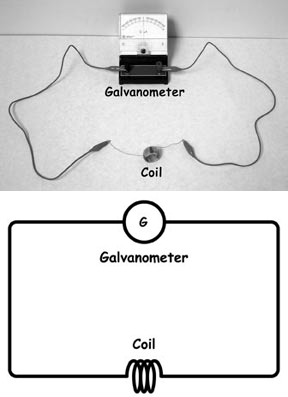
Figure 2.8 Coil of wire in an electrical circuit with a galvanometer
This activity demonstrates that moving magnets across a closed wire loop will generate current. Before you start with the students, set up a different apparatus in the electrical circuit. Take a coil of wire and connect it to an ammeter or galvanometer (See Figure 2.8).
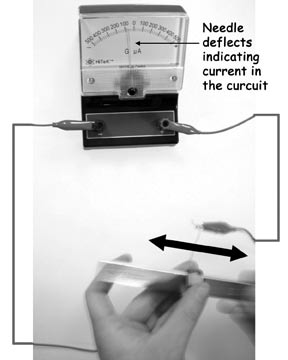
Figure 2.9 Moving a magnet through the coil of wire produces a current. Blurry elements in the figure are an effect of this mothion being photographed.
| 22. |
 |
Discuss with the students what they are observing. [A moving magnet pushes charge. How? Charge can only be pushed by an electric field so the changing magnetic field must create an electric field, just as the changing electric field of the moving charges created a magnetic field in the previous steps. In the 19th century, it was realized that the electric and magnetic forces were really two manifestations of the same force, called the electromagnetic force.]
|
 |
| 23. |
 |
To conclude this activity, have a discussion about the production of magnetic fields in nature. Have students brainstorm about where in nature they have experienced or heard of magnetic fields existing. Examples: Aurora, Lightning, Loadstones, Earth, Planets, the Sun, the Solar Wind, the Interstellar Medium, the Galaxy. The teacher could begin talking about how waves in the electric field would be expected to produce waves of magnetic fields, which would in turn induce more waving electric fields, resulting in electromagnetic waves which could travel through a vacuum (as well as through conducting media) at a speed of 300,000 km/s (186,000 miles/sec) which is the speed of light. This realization lead James Clark Maxwell to theorize that light was in fact a form of electromagnetic radiation, which was later proved to be the case. Other forms of electromagnetic radiation are Radio Waves, Microwaves, Infrared light, Ultraviolet light, X-rays, and Gamma Rays.
|
 |
| 24. |
 |
Hand out Worksheet 2.2 to assess your students’ understanding of their observations.
|
- back to top -
Worksheets and Rubrics
- back to top -
The Session 2 Worksheets and Rubrics can be downloaded here:
- back to top - |
|

