|
Session 1: Magnetism
“Science is built up with facts, as a house is with stones. But a collection of facts is no more a science than a heap of stones is a house.” - Jules Henri Poincare
Session Summary
Students will learn about the magnetic field of a bar magnet. By the end of this activity, the students will know that bar magnets have two “poles,” and that similar poles repel and different poles attract. They will know that magnetic fields are invisible, but they can be measured and they have a direction. They will know that a compass is made up of a tiny bar magnet that aligns itself with strong magnetic fields.
Student Objectives
- Students will know that magnets have an invisible force field known as a magnetic field.
- Students will be able to detect and draw a magnetic field using compasses.
- Students will know that a compass is made up of a tiny bar magnet that aligns itself with a large magnetic field.
- Students will know that bar magnets have two poles and that similar poles repel each other and differing poles attract each other.
National Science Education Content Standards
- Unifying Concepts and Processes: Evidence, models, and explanation; Change, constancy, and measurement
- Science as Inquiry: Abilities necessary to do scientific inquiry; Understandings about scientific inquiry
- Physical Science: Properties and changes of properties in matter; Motions and Forces
Materials Needed (per group of students)
- 1 magnetic compass per student
- 2 Alnico bar magnets
- 6 sheets of white paper
- 4-5 paper clips, a wooden or plastic ruler, and a pencil
- (optional) 1 salt shaker of iron filings
- copper or aluminum wire
Additional Materials (for demonstration or per group)
- 1 cow magnet
- 1 small/medium sized bottle (clear plastic or glass)
- 2 tablespoons of iron filings
- 1 manila envelope
- 1 roll of scotch tape (duct tape would be fine too)
- 1 piece paper or tissue paper
Hints
- Caution: Chrome-Steele and ceramic bar magnets
Chrome bar magnets quickly lose their magnetic fields when dropped and we recommend that you do not use them. Ceramic bar magnets are usually very strong but brittle and hard to work with. However, there are some ceramic bar magnets that are coated with plastic that will last longer than the non-coated ceramic bar magnets.
- Recommendation: Alnico and cow magnets
We recommend that you use Alnico bar magnets or cow magnets. See the Resources Section for some companies that sell these types of magnets on-line, and the text below for more information on cow magnets.
- Recommendation: Compasses with transparent (glass or plastic) faces
These types of compasses can be used on overhead transparencies to demonstrate how to do the magnetic field mapping or together with iron filings to include the direction of the magnetic field. The Resources Section lists some companies that sell these types of compasses on-line.
- Caution: Compasses can easily change polarity using magnets
It is fun to use the bar magnet to make a compass needle rotate around. However, if while doing this the needle does not move, the polarity (north and south locations) can be reversed. To make the needle point in the correct direction, the polarity of the needle must be such that the arrow points toward Earth’s geographic north when standing outside away from electricity and other magnets. In order to reverse the polarity of the compass needle in a controlled fashion, hold the compass so the needle is horizontal. Then take the bar magnet and move one pole of the magnet length-wise across the compass needle, making sure the needle does not move.
- Caution: Naming conventions with magnetic poles
By convention in the United States today, the compass arrow points in approximately the direction of the North Geographic Pole. And by convention (unrelated to the first convention), the compass arrow is a magnetic north pole, which is attracted to (points to) the magnetic south pole of a bar magnet, often marked with an “S” or with blue color. Using the fact that opposite poles attract, this means that the compass arrow must be attracted to a magnetic south pole in the Northern Hemisphere on Earth. See the Background Material section for more information on the convention of Geographic North and Magnetic North Poles.
- Caution: Safely working with iron filings
To avoid students accidentally getting iron filings in their eyes during this session, students should wear safety goggles when working with iron filings.
- back to top -
Activity 1: Mapping Magnetic Field Lines
- back to top -
!! WARNING !! Do not bring bar magnets near computers, computer monitors, audio tapes, or other such magnetic devices. Strong magnets can destroy materials with magnetic properties.
| 1. |
 |
Begin this lesson with an introductory discussion with the students about magnetism. Ask your students about their experiences with magnetism and their knowledge and ideas about what it is and what causes it. Ask questions about whether or not Earth is magnetic, how they know if it is or not, and if there are any other astronomical bodies that are magnetic (like the Sun). You might also ask if they know what a magnetic compass is and what it does.
One key goal of this discussion is to draw out any misconceptions that may be in students’ minds about magnetism. One such misconception is that magnetism needs to be transmitted through a medium. It does not, it can be transmitted through a complete vacuum. |
|
| 2. |
|
Hand out Worksheet 1.1 and two Alnico bar magnets to groups of 2-4 students. Allow students some time to freely experiment with the magnets and materials around them, such as paper clips, rulers, copper or aluminum wire, and pencils. You may make some suggestions about trying to get the magnets to attract or repel each other and attract or repel the other objects. Have the students take notes about their discoveries on Worksheet 1.1.
The goal here is for the students to discover that magnets attract metals containing iron, nickel, and/or cobalt but not most other materials. You may want to direct them toward discovering the fact that when some metals are touching a magnet they becomes magnetic themselves: i.e. if you touch one end of a paperclip to a magnet, the other end will attract other paper clips. You may wish to provide non-magnetic metals, such as copper or aluminum to demonstrate that these metals are not magnetic. |
|
| 3. |
|
Now give each student a magnetic compass. Discuss with the students what they know about compasses. Teach the students how a compass works by having each student hold the compass so that the disc of the compass is horizontal and the N-S markings are facing up. Next have the students align the line marked “N” (for North) on the glass/plastic top with the arrow inside the compass. Talk about how compasses are used in the wilderness. |
|
| 4. |
|
Let the students experiment with bringing the compass near their bar magnets, first with one bar magnet and then with pairs of bar magnets in random configurations. Have them take notes and make sketches about what they discover on Worksheet 1.1. |
|
| 5. |
|
Eventually, have the students arrange their compasses around one of the bar magnets as shown in Figure 1.1 |
|
| 6. |
|
Ask the students: “How do compasses work?” Eventuallly bring out the fact (after ample discussion) that the compass needle is a tiny magnet suspended on a pivot (so that it will turn with minimal friction if a magnetic force is applied to it). |
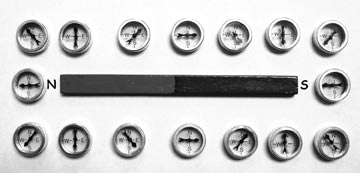
Figure 1.1 Bar Magnet with magnetic compasses placed around it. Note how the heads of the compass needles point toward the magnetic south pole and away from the magnetic north pole of the Bar Magnet.
| 7. |
|
Next, hand out Worksheet 1.2. Have the students tape some white paper together and place the bar magnets on top and in the middle of the taped paper. Tell the students that they will now trace the magnetic force field shape around the bar magnet. Ask them to hypothesize what they think the magnetic force field will look like and to draw it on Worksheet 1.2.
To make the tracings, have the students do the following:
| a. |
Draw a dot somewhere near the magnet and place the center of a compass over the dot. |
| b. |
Draw a dot at the location of the arrow head (or tail) of the compass needle. |
| c. |
Move the compass center to this new dot, and again draw a dot at the location of the compass needle head (or tail). |
| d. |
Remove the compass from the paper and draw lines connecting the dots with arrows indicating the direction hat the compass points. |
| e. |
Continue steps b-d until the line meets the magnet or the edge of the paper. |
| f. |
Pick another spot near the magnet and repeat the process (steps a-e). |
Have the students continue until they have lines surrounding the magnet as shown in Figure 1.2: a dipole pattern of force field. Introduce the term dipole (two-pole) magnetic field.
|
|
| 8. |
|
If time permits, have them place two magnets side-by-side and do the same magnetic field tracing procedure again. Be sure to ask the students to draw their predictions of what the field of force will look like on Worksheet 1.2 before they determine its configuration with the compass and paper. |
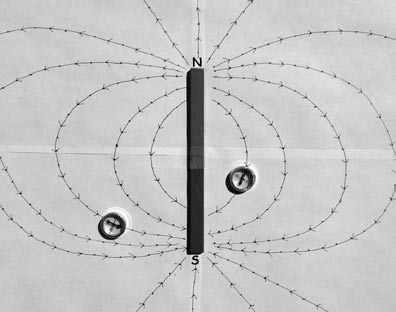
Figure 1.2 Magnetic Field line tracing of a bar magnet with a dipole magnetic field using compasses.
- back to top -
Activity 2: Iron Filings and (2-3D) Magnetic Field Lines
- back to top -
[These activities are optional or they can be demonstrated in front of the class by the teacher instead of done by the students. If done as a demonstration, the iron filings should be sprinkled on a transparency that lays on top of the magnet(s) on an overhead projector. ]
!! WARNING !! Iron filings are messy and will stick to magnets. It is important to have paper or transparencies between the filings and the magnets.
| 9. |
|
Give groups of 2-4 students iron filings and several thin sheets of paper. Have the students place the paper on top of one of their bar magnets, trace the outline of the bar magnet and mark which end is North and which is South. Lightly sprinkle the iron filings uniformly over the paper and then give the paper some gentle taps to make the filings align with the magnetic field, as shown in the photographs in Figure 1.3.
|
|
| 10. |
|
Have the students record their observations on Worksheet 1.3. Ask some probing questions to get the students to think about what they are seeing. Can they explain what is happening? Have them form some ideas (hypotheses) about what could be the explanation for what they observe. Do they see the same shape as they did with their compass tracings on paper around the bar magnets? The students should write down their answers to the questions on Worksheet 1.3. If you haven’t already discussed how the filings act like tiny magnets, maybe now some students will be able to deduce this fact. |
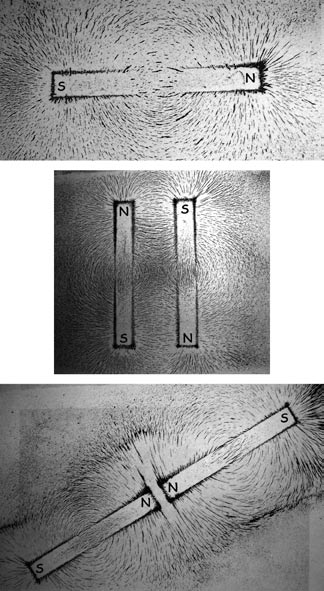
Figure 1.3 Iron filings on thin sheets of paper over bar magnets.
| 11. |
|
Lift up the paper carefully so as to not spill any of the filings, and funnel them back into your filings jar. Have the students place two magnets in some configuration of their choosing. On Worksheet 1.3, have students record a drawing of what they hypothesize the magnetic field will look like, then place the paper on top of the magnets and sprinkle some iron filings over it, tapping gently the paper to get the filings to align with the magnetic field. Now what do they see? Make sure they record their observations carefully by making drawings of their results and compare them to their predictions.
|
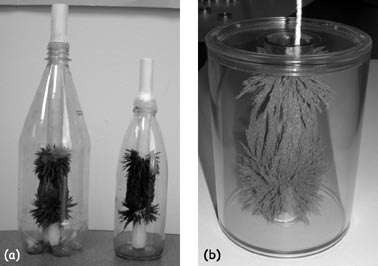
Figure 1.4 Visualizing the 3D magnetic field around a cow magnet using a 3D magnetic field visualizer made with simple materials (a), and purchased commercially (b).
| 12. |
|
For this step the teacher may simply do a demonstration for the class, or if you have enough materials, each group could build a 3-Dimensional (3-D) magnetic field visualizer. As the name suggests, you will construct (or buy if you have the funds) a device to visualize the 3-D structure of a magnetic field around a cow magnet.
To construct your visualizer obtain a clear plastic or glass bottle, small/medium sized (i.e. a 20 oz. soda or water bottle). Clear away any labels on the bottle.
- Cut a manila folder so that you can roll it up tightly into a tube about the diameter of your cow magnet and a length slightly longer than your bottle. Tape the tube to keep it rolled up.
- Seal one end of the tube with tape and stuff some paper into that end from the open end so that when you insert the cow magnet into the tube it will not go all the way to the bottom of the tube.
- Pour some iron filings into the bottle; enough to coat the bottom with a layer ¼ inch thick should be fine.
- Insert the tube into the bottle and use paper and tape to seal up the bottle opening around the tube.
Now, drop your cow magnet into the tube. Use a pencil to hold it in place and then shake the bottle. The iron filings will then stick to the outside of the tube and take the form of the magnetic field surrounding the magnet. Have students hypothesize the shape of the field before you actually do this.
You can remove the cow magnet by turning the bottle over and shaking it out (it will resist as the magnetic force of the filings will act to hold it in). Or you can fish it out of the tube by tying a string to a large paper clip and dropping it down into the tube and then pulling the magnet out. It’s a neat effect to watch the filings be dragged up the tube until the magnet disappears and the filings drop away like dust.
You can also purchase a pre-made, sealed tube with iron filings inside and a cow magnet for about $13 at most science classroom supply stores online (see resource list). For examples of the home-made tubes, see Figure 1.4a), and of a manufactured tube, see Figure 1.4b).
An optional method of viewing the 3-D field of force surrounding a magnet is to fill a bottle with mineral oil and a couple of table spoons of iron filings. Seal the bottle and shake it up. As the filings begin settling place a magnet (the stronger the better, and cow magnets are stronger than bar magnets of the same size generally) against the side of the bottle. Hold the bottle up to the light and you will see the filings moving along the magnetic lines of force. You should be able to see full loops of force from one pole to the other. If you have a horseshoe magnet (a bar magnet that has been bent into the shape of a horseshoe such that both poles are near each other) it can yield the most dramatic demonstration of the magnetic loops. |
|
| 13. |
|
After completing the preceding activities the teacher should discuss with the students some of their observations, and have them explain their ideas and conclusions. Make sure to bring out the idea of like poles repelling and opposite poles attracting and that the magnetic force field has a direction. Also make note that the magnet would attract metals but not other kinds of materials. Perhaps bring out the idea that the iron filings were like tiny bar magnets that were aligning their poles with the attraction of opposite poles and repelling of like poles. Worksheets 1.1, 1.2, and 1.3 can be used as are appropriate and you can develop your own question and answers.
|
- back to top -
Worksheets and Rubrics
- back to top -
The Session 1 Worksheets and Rubrics can be downloaded here:
- back to top - |
|
